Here in Australia we don't see much snow and I for one have never had a white Christmas. I do rather like the idea of frolicking in the snow, but I have heard that it can be awful cold and wet.
Todays tutorial for a lovely paper snowflake is the opposite of cold and wet, and if that doesn't seal the deal for you, it is also amazingly pretty.
You will need a stapler, some tape or glue, 6 sheets of A4 paper and some scissors.

- Take all 6 sheets of paper and undergo tricky surgery on them in order to turn these pesky rectangles into squares. You do this by folding the top right corner down towards the left hand side, then cutting off the excess.
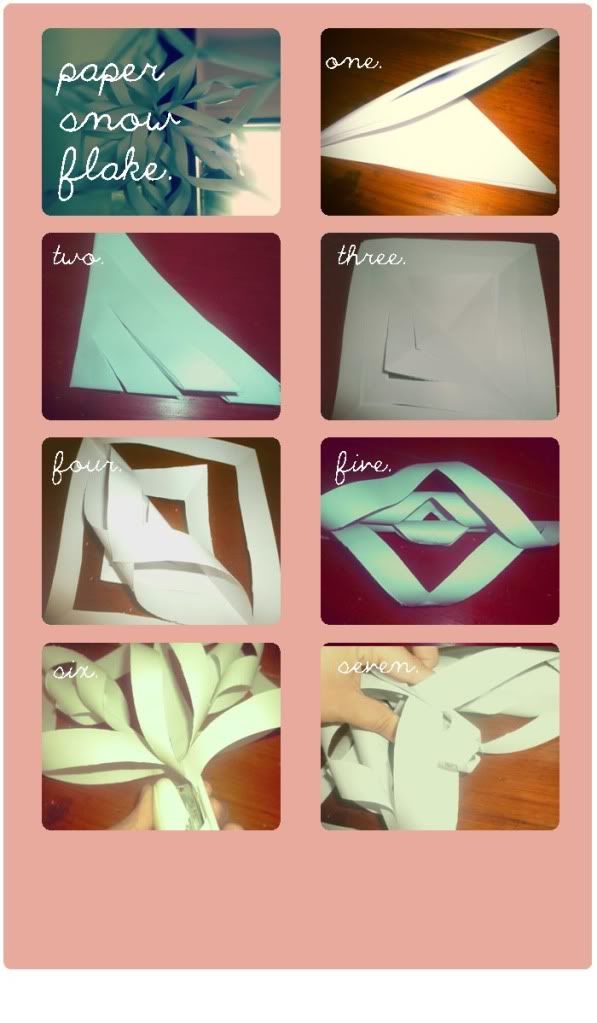
- Your nifty squares need to become a folded triangle so fold diagonally twice so it looks like the step one image.
- You need to make three cuts in the triangle starting from the side with one fold stopping about 2 cm before the other edge.
- open out your paper into a square. It should look like step three.
- Separate the pieces from one another and begin forming the snowflake segments. Do this by grabbing the two mini triangles in the centre of the square and taping or gluing them together as in step four. You then skip a triangle and tape the next ones together.
- Flip your work over and tape remaining triangles together. You should have a 3D creation that looks something like step 5. You will need to repeat this another 5 times.
- Staple your segments together as shown; at the centre and the sides. Voila, a festive paper snowflake to bring a touch of the northern hemisphere to your holidays.
I am not sure how it would go down if you tried to frolic in these snowflakes, you might end up with a few paper cuts. But whatever floats your boat.
Adieu x


and thanks for the sweet comment, hopefully you come back for a virtual visit soon! Wish i'd seen these paper stars before my post, cute idea
ReplyDelete